How to Install Flush Mount Ceiling Light Fixtures

How to Connect a Flush Mount All By yourself
You don't need a electrician to add new fixtures to your space.Check out this
simple DIY tutorial to learn how to replace a ceiling light
DIY projects are an awesome way to update your home's look and increase its value at the same time. One of the easiest home improvements is updating your flush-mount ceiling light fixtures. While some lighting projects do require you to hire an electrician, replacing old ceiling lights is a project most people can handle ' with the right instructions. Working with electricity can be a little scary, so be sure to follow all safety tips. Read on for an easy, step-by-step guide to replacing your flush-mounted ceiling lights.
Tools For Installing Flush Mount Ceiling Lights:
Before you begin, gather together all of the tools you'll need for this project. Replacing a flush-mounted ceiling light is fairly simple, so our list of tools is too. A flat-head and Phillips screwdriver and a small adjustable wrench are all you need. If you have a power screwdriver, it'll make the job go a little faster.
WHAT YOU'LL NEED
How To Safely Turn Off The Power:
Before you begin, make sure all power to the light fixture is turned off. Find your breaker box (it's usually in a laundry room or garage). Look at the list on the inside of the door ' you'll see the names of areas in your home, and each will have a number. Find the number of the room you're working in, and then find the breaker switch with that number and push it to the OFF position. This turns off all power to that room. Double check by flipping the light switch for your ceiling fixture. Never rely on the light switch to turn off the power.


How To Remove An Old Ceiling Light:
With the power off, remove the old ceiling light. Usually you'll have to remove the cover or glass globe by unscrewing a finial or screws. Then detach it from the ceiling, disconnect the old wires and take it down.
Disconnecting The Wires:
- Inside the fixture, there are usually two screws that hold the light to the ceiling plate, or a center post with a nut. Unscrew them slowly and lower the fixture a few inches.
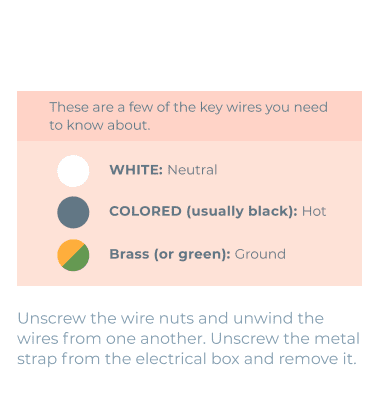
- Inside the ceiling you'll see a box with thick wires ' typically, a white one and a black one. Pull the wires out and unscrew the wire nuts; then untwist the wires to free them.
- A third, bare wire is the ground wire ' unwind it carefully. (If the old fixture doesn't have a ground wire, it's fine ' your new one does.)
- Now the old light fixture should be completely disconnected and you can set it aside.
- Remove the old base plate - it usually looks like a flat bar going across the box, but it may be a round plate. You should now have an open box and wires hanging down.

How To Wire A Flush Mount Ceiling Light:
Having a friend hold the light fixture while you connect the wires will make this part much easier. First, check the instructions for your ceiling light to see how it attaches to the box. It's usually a pair of screws, or a central post. Make sure you have the parts handy. But before you attach it, you need to connect the wires first.
Have your friend hold the light fixture a few inches below the ceiling while you connect the wires. How do you connect the wires? On the ends of the black and white wires there's a bit of exposed copper wire, which you twist tightly together and then cap firmly with a wire nut.
Connecting The Wires:
- Screw the base plate from your new light fixture onto the post in the ceiling box ' make sure it's snug against the ceiling.
- Connect the white wire from your light fixture to the white wire in the ceiling box. Push the wires up into the box.
- Connect the black (or orange) wire from your light fixture to the black (or orange) wire in your ceiling box. Push the wires up into the box.
- Connect the thin ground wire from your light fixture to the bare ground wire in the ceiling box; push them up into the box.
- If there is no ground wire in the ceiling, wrap the thin wire around the small grounding screw on the back plate a few times, and gently tighten the screw to hold it.
- Make sure all wires are inside the ceiling box.
Ceiling Light Installation Pro Tip!
Make sure the light fixture is working before putting on the shade or glass cover.


Back at your breaker box, turn the power back on. If the light doesn't turn on, double check all of your wiring connections. But if you followed our easy guide, your flush-mount light fixture should be working perfectly ' finish up by installing the shade or light cover.
Now step back, give your friend a high-five, and enjoy your new flush-mount ceiling light!
For more helpful tips on lighting your home, check out our complete Lighting Guide .
How to Install Flush Mount Ceiling Light Fixtures
Source: https://www.eyely.com/blogs/lighting/how-to-install-flush-mount-ceiling-lights-diy
0 Response to "How to Install Flush Mount Ceiling Light Fixtures"
Post a Comment