What Do I Use to Make Stickers With Cricut
Larn how easy it is to make beautiful custom stickers with Cricut Print And so Cut. All you demand is an inkjet printer and a Cricut cutting machine to brand professional-level stickers at home!
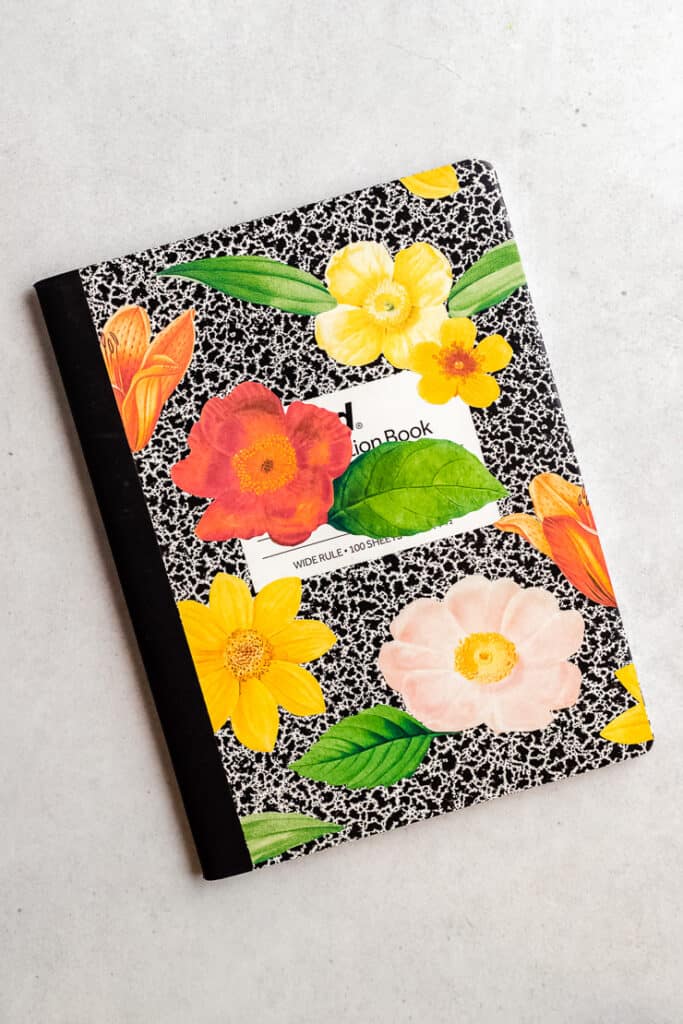
Custom stickers are such a fun way to decorate and personalize your planner or bullet journal. I love using customized stickers to label craft supplies or pantry storage. Handmade stickers make thoughtful gifts and corking pocket-sized items to sell in your Etsy shop, likewise!
Printable Stickers with Cricut
Information technology'south easy to make colorful custom stickers at home with the assist of a Cricut cutting machine and it'south Print Then Cut feature.
With the Impress And so Cut method, you'll first impress the sticker design onto sticker newspaper and then use the Cricut automobile to cut out each sticker.
In this article, I'll evidence you step-by-footstep how to make stickers with Cricut's "Print and then Cut" feature. I'll explain how to set up the epitome file in Blueprint Space, how to print them on a regular inkjet printer, and how to get the best results from your Cricut cutting machine. Plus, I'll share my sticker canvass file with yous as a gratis download.
New to Cricut? Yous may want to read this commencement: What is a Cricut Machine, and What Tin information technology Exercise?

What is Impress And so Cut?
One of the things I beloved about my Cricut machine is the "Print Then Cutting" feature. Print So Cutting is an easy method to cut around designs that yous've showtime printed on your home printer.
With this characteristic, y'all showtime print your images on your home inkjet printer and so cut them out with your Cricut Maker or Cricut Explore.
At this time, only the Cricut Explore and Cricut Maker models can practise Print then Cut. The Cricut Joy can't make stickers with the Print Then Cut feature, simply it tin can write directly on special Cricut Smart Labels.
What yous Demand to Make Stickers
Here are the supplies you'll need to make printable stickers with Cricut:
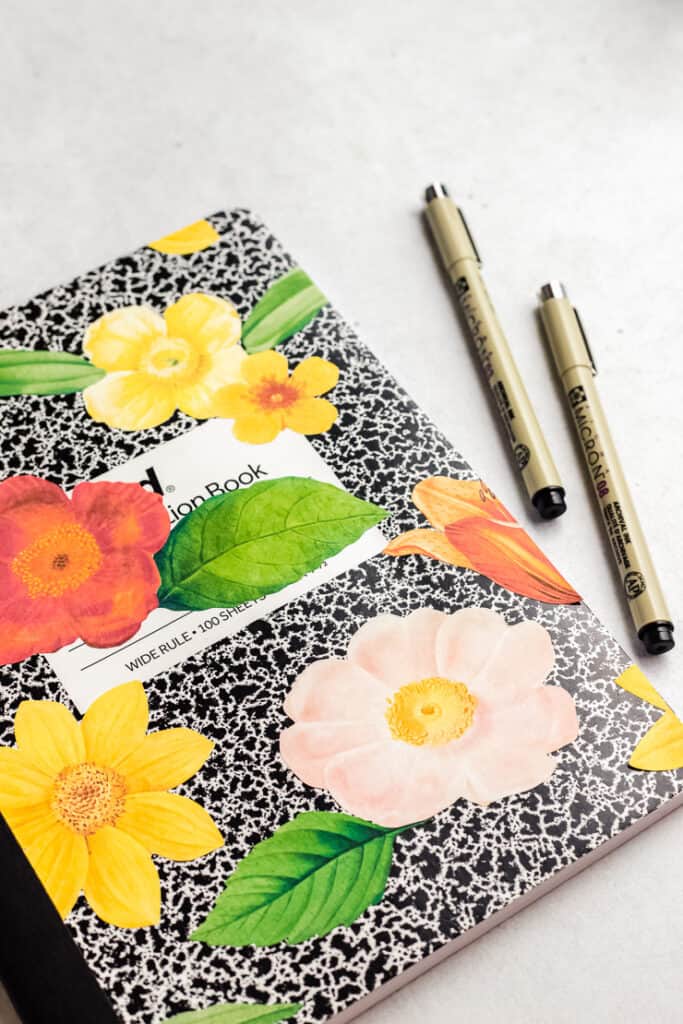
- Sticker newspaper
- Inkjet printer
- Cricut Maker or Cricut Explore Air two
- Cricut Design Space
- Sticker sheet prototype file
Let's talk about each of these materials in a little more detail:
Best Sticker Paper for Cricut
When shopping, look for a matte white, total-sheet printable sticker paper made for inkjet printers.
Cricut brand printable sticker paper is high-quality, only it'southward thicker than other brands of sticker paper. So, some people have trouble getting the Cricut brand sticker paper to go through their printer smoothly.
If you are worried about that, I'd recommend a different matte sticker paper, like this one from Avery brand. If y'all want to brand a lot of stickers, this 90 pack of sticker paper is a good value.
Yous can besides notice sleeky printable vinyl if yous want a sticker cloth with a little more water resistance. (For even more durability, you lot can seal the stickers with a thin layer of clear UV-resistant sealer spray.)
Inkjet Printer for Stickers
Any high-quality full-color inkjet printer will work for Print And then Cut stickers. But, if yous are looking for a new printer, I love the Catechism PIXMA TS9521C. This printer is peculiarly slap-up for paper crafters considering it features 12″ x 12″ borderless printing (not that you need it for this particular project!)
Best Cricut Machine for Making Stickers
Both the Cricut Explore Air 2 and the Cricut Maker are nifty for making stickers. Both work with the Print And then Cut feature. The Cricut Joy, all the same, does not work with the Print And so Cut method.
All that said, if yous want to make stickers without a Cricut, y'all can cut out your printed designs with scissors or an X-Acto knife.
Sticker Canvass Image File
Terminal merely not least, you lot'll need an paradigm file to print and cut. You can create your sticker blueprint or find a sticker canvass file to download.
Where can y'all find sticker designs?
You lot can find images to use as stickers on lots of different websites. For example, I used public domain botanical images for the stickers you see in this post.
Another great websites to detect sticker designs are:
- Etsy
- Artistic Market place
- and Creative Fabrica
If you want to follow along with me, sign up below and receive the aforementioned Botanical Sticker Sheet I'm using in this tutorial.
Designing Stickers in Procreate
You lot tin as well utilise a graphic design program similar Photoshop or Procreate to draw your ain illustrations or lettering for stickers.
In fact, my favorite style to make give-and-take stickers with Cricut is to first depict the letting in Procreate.
If y'all are drawing your ain stickers, you should know that Print Then Cut'southward maximum printable surface area is 9.25″ ten six.75″. Make sure that your finished sticker sheet blueprint is this size or smaller.
You lot can pattern full-drain stickers or stickers with a white edge. Cricut Design space will add a bleed by default, but you tin can toggle that off.
And finally, be sure to export the illustration as a PNG to preserve transparency. After you consign your image file, yous can upload it to Cricut Design Infinite.
Designing Stickers with Design Infinite
Yous can also design your stickers directly in Cricut Design Space. You can combine the built-in shapes with text and graphics from the Blueprint infinite library.
Note: If you don't already take Cricut Blueprint Space, you can download it for gratis. You can use the programme on Mac, Windows, iOS (iPhone or iPad), and Android devices.
Since the maximum image size for Impress Then Cut is 9.25″ x 6.75″, I suggest calculation a 9.25″ x 6.75″ rectangle Template to my Design Space sheet to help plan your design.
You tin then utilize the basic shapes, text, and Cricut Access library images to create a sticker canvas. In one case you've finished your blueprint, select everything, and use the Flatten tool to combine the shapes and text into one printable layer.
Notation: A Cricut Admission membership will requite yous unlimited use of Cricut's huge design library. There are over 100,000+ images and 500+ fonts, with more than added every month. If you don't already have a subscription to Cricut Admission, you lot can sign up for as trivial equally $7.99/month.
How to make whatever image printable
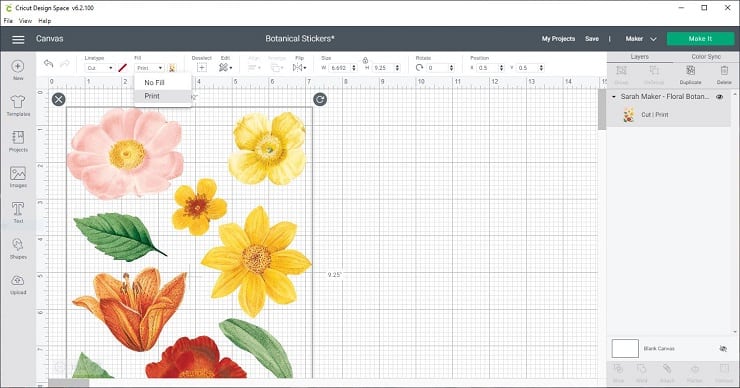
You can convert any pattern into a printable image by irresolute the Fill up blazon. To change the Fill blazon, become to the Edit bar, select the Fill dropdown, and select Print.
Note: You tin use the Flattentool to combine multiple layers into one unmarried, printable layer.
How to Brand Print And so Cut Stickers
Here are the pace-by-pace instructions to brand custom Print And so Cut stickers with Cricut.
Instructions
Step one: Create the image file
Download a premade sticker canvas epitome file. Or, design your own sticker sheet image in an app similar Procreate, Illustrator, or Pattern Space.

Step ii: Upload the sticker paradigm to Cricut Blueprint Space
First, open Cricut Pattern Space. Create a new project, then click the Upload button on the main canvas. Find your image file, and so click Upload Image to import your sticker design.
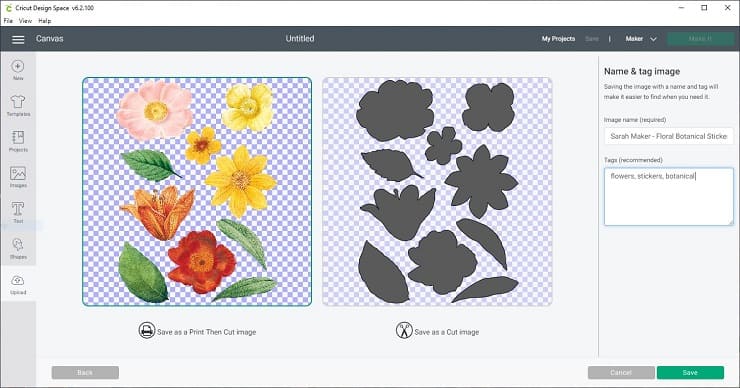
Cricut Design Space volition prompt y'all to choose the prototype type. I almost e'er choose a Complex prototype.
On the next screen, click Save as a Print then Cut Prototype. You can name and tag the paradigm if you lot like. Then printing Save.
Finally, click Insert Image to add the image to your Canvas.
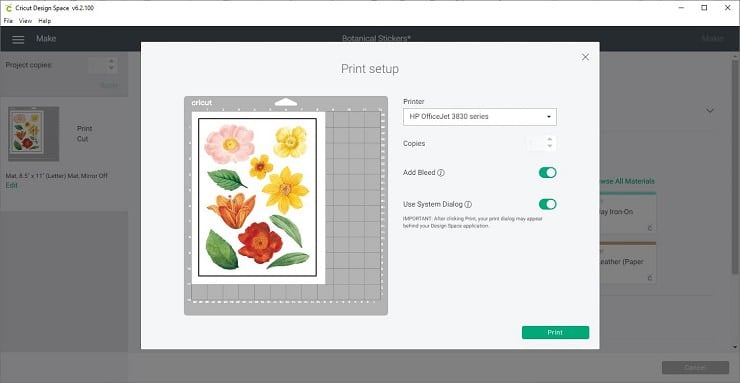
Step 3: Print the prototype
Once the prototype is on the canvas, you might need to resize information technology to be compatible Print so Cut. If the image is likewise large, make it smaller until it fits within the maximum 6.75″ by 9.25″ printable expanse.
Load the sticker paper into your inkjet printer. (For my printer, I load the sticker paper facing up. Your printer may be different, so be sure to double-check.)
And then, click the Arrive push button in Cricut Pattern Infinite. Click Continue, then Send to Printer, so Impress to print out the sticker design.
You tin toggle the Use System Dialog to access more avant-garde printer settings to become the highest quality print from your machine.
You will notice that the printed canvass has a solid black rectangle around the edges of the design. This is right. The Cricut automobile will utilise those printed blackness lines to orientate itself to cutting the blueprint correctly.
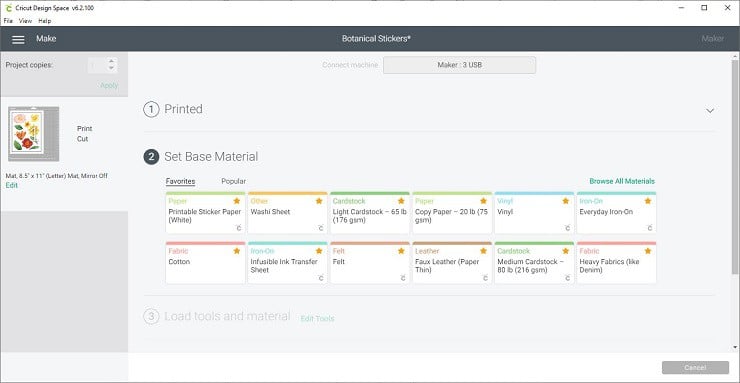
Step 4: Set Materials
Go back to Cricut Design Space, and select your textile. In the material settings, select "sticker paper" if you are using Cricut brand sticker paper, or "washi" if you are using Avery brand sticker paper. (For Cricut Explore users, remember to set the dial to Custom to see this option.)
Annotation: Your fabric settings may change depending on whether you'd like to make "kiss cut" stickers (meaning the Cricut only cuts through the top layer, leaving the bankroll canvass intact) or "die cut" stickers (meaning the Cricut cuts through both layer to create separate stickers). In well-nigh cases, a "washi" or "sticky notation" setting will produce a "osculation cut", but you may have to play around with the settings depending on your materials.
Step v: Load the Mat
Place the printed sticker paper onto the LightGrip blue mat. Try to line upwardly the page every bit close to the upper left corner as possible. Smooth the sticker paper down with your hands or a brayer tool. Press the flashing arrow button to load the mat into the Cricut car.

Stride 6: Cut the stickers.
One time the mat is loaded into the auto, you lot should run across the Cricut icon button start to flash. This means that the auto is ready to cutting out the stickers. Press the C button to start the cut.
You will notice that the Cricut will begin moving around your paper to scan the black registration lines. After it scans the newspaper, it volition start to cut.

Step seven: Unload the Mat and Remove the Stickers
The Cricut machine will tell yous to unload the mat when the cut is finished. Press the flashing arrow button to unload the mat.
Earlier removing the mat from the car, you may want to cheque that the cutting has going all the way through – especially if you desire to make "die cut" stickers. If it hasn't, you can run information technology through a 2nd time.
When you are done cutting, remove the mat from the machine and remove the stickers from the mat. Your stickers are now ready to apply!

If you are having trouble with your sticker sheet ripping or curling as you pare information technology off, try this: Plough the whole mat upside down onto a make clean piece of work surface, and pare the mat off of the sticker canvass. This technique will continue the stickers from crimper up!
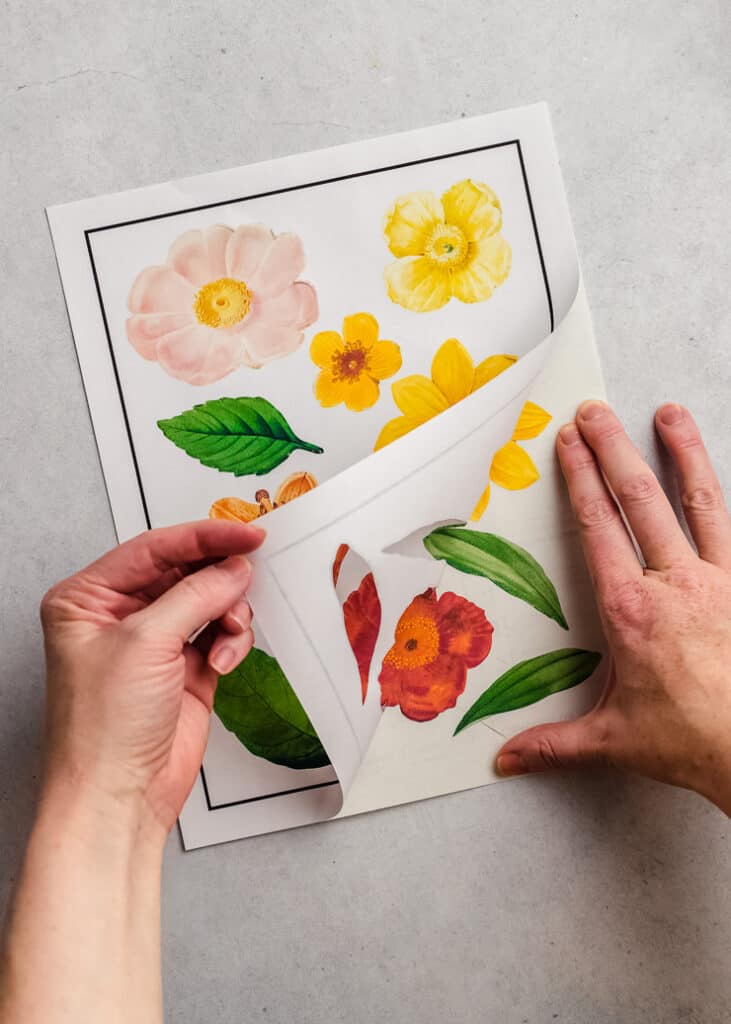
Then, if you lot've made a "kiss cut", you tin can remove the outer layer of sticker paper from the cut stickers. And so, you'll have perfectly cut stickers attached to the bankroll canvas, ready to use.
Tips for Print Then Cut
Here are some important things to recall when setting upward a "Print then Cut" Project:
Image Size
If you are trying to Print then Cut an paradigm that is also large, yous volition meet a alert symbol in the Layers panel on the right-hand side of your screen. Reduce the image size to six.75″ past 9.25 or less, and effort again.
Image Drain
By default, Cricut design space will requite your image a "drain," which is an extra edge that extends beyond the cut line. The bleed may make the printed image look blurry, like it has a fuzzy edge. Don't worry; this extra border volition exist trimmed off in the cutting step.
If y'all are making stickers with a white border, you tin can safely plow off the bleed.
Material Placement
Place the printed sticker paper in the acme left corner of the cutting mat. Attempt to align the top edge with filigree lines on the mat. Exercise your all-time to ensure that the sticker paper is straight and smooth. This will help the Cricut machine to read the sensor marks and brand accurate cuts.
Complete the Project in one Session
For the all-time results, attempt to complete the entire procedure in ane session. Use the same calculator and the same browser to access Blueprint Infinite. This manner, y'all'll avert most printing problems, registration errors, or cutting mistakes.

Troubleshooting Print So Cut
Sometimes Impress So Cut projects don't plow out equally intended. If that's the example, bank check out some of these troubleshooting tips and frequently asked questions.
If your Cricut cannot read the cutting sensor marks,at that place are a few things to check. Hither are some of the reasons why your Cricut can not read the cut sensor marks correctly for your Impress Then Cut projects:
- too much direct lighting or glare
- incorrect material placement or mat placement
- glossy, patterned, or smudged material
For more than information almost troubleshooting Print And then Cut sensor errors, click here.
If the cuts don't match the prototype, your Cricut may need to exist calibrated. To calibrate your machine for Print So Cut, Select Calibrate from the carte du jour and print out the calibration sail.
Then, follow the directions on this page.
If the Cricut cuts through the backing sheet, you may need to conform the pressure settings. To make what's chosen a "osculation cut," you'll need to decrease the cutting pressure level and then that the Cricut cuts through the sticker layer but leaves the bankroll layer intact.
If you are using the Cricut brand sticker paper, the "sticker paper" setting should produce a "osculation cut."
If y'all are using another sticker paper brand, you volition about likely demand to utilize less pressure to produce a "osculation cutting." Try changing the pressure level setting to "less" or choosing a dissimilar custom setting like "sticky note" or "washi."
Download the Complimentary File
Don't forget to take hold of my free Botanical Sticker Sheet file so yous can make your own Print then Cut stickers at home.
More Cricut Ideas
If you lot dear crafting with Cricut, you lot may be interested in some of these related projects and tutorials:
- What is a Cricut Machine, and What Can information technology Do?
- How to Make a Monogram in Cricut Pattern Space
- 35 Best Free Monogram Fonts (For Cricut and More than!)
Have questions? Bring together the Facebook Group!
I hope this article was useful for you lot! If you have any additional questions, experience free to join my Facebook Group. I created this group for you to share pictures, enquire questions, and help each other out.
What's Adjacent?
Pin this post: Save this tutorial to your Pinterest boards so that yous tin come back to it later.
Leave a comment: I love to hear your feedback. Tell me in the comments beneath!
Share on Instagram or Facebook: When you make this project, share information technology on social media and tag me @sarahmaker. I love to run into what you make!
Instructions
- Download a premade sticker sheet prototype file. Or, blueprint your own sticker sheet image in an app like Procreate, Illustrator, or Design Infinite.
- Upload the sticker image to Cricut Design Space. Click Insert Paradigm to add the image to your Canvas.
- Load sticker newspaper into your inkjet printer. Click the Make it button to start the Print Then Cutting project. Using the dialog box in Cricut Pattern Space, send the image to print.
- Place the printed paper onto the Cricut mat. Load the mat into the machine. Choose the correct material settings, and press the button to cutting the stickers.
- Unload the mat and remove the stickers.

Sarah Stearns has helped thousands of makers find their next craft project with free patterns and step-by-footstep tutorials on her weblog, sarahmaker.com. Read more.
Her work has been featured in Scientific American, Skillful Housekeeping, Vox, Apartment Therapy, and more.
melbourneamigh1952.blogspot.com
Source: https://sarahmaker.com/print-cricut-stickers/
0 Response to "What Do I Use to Make Stickers With Cricut"
Post a Comment